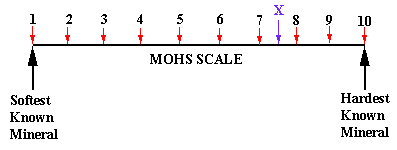
- After you have read these instructions (1 through 4), you will go to the Virtual Hardness Testing Lab. There you will see the Hardness Evaluation Table.
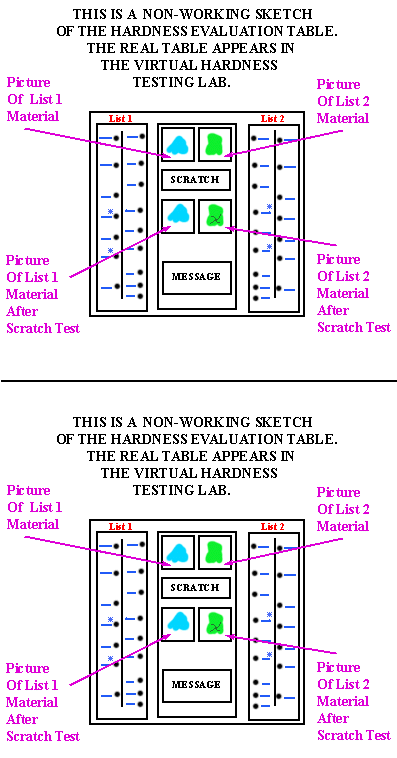
- HOW THE TABLE WORKS: A sketch (not the real thing) of the Table is shown on the right. The Table has two identical lists of mineral specimens and testing tools: one on the left (List 1) and one on the right (List 2). The Mohs mineral specimens are marked with asterisks *.
- On the real Table, you will click on the buttons to choose a different mineral from each list. Pictures of the two minerals will appear in the top two boxes.
- Then you will press the "SCRATCH" button. Pictures of the same two mineral specimens will appear in the lower two boxes. The softer of the two minerals will have a scratch on it. A message will appear in the message box.
- WHAT TO DO: For all of the minerals that you have been assigned that appear on the Hardness Evaluation Table, follow steps (a) through (d). Keep a record of your results (the numbers of the specimens tested and their hardnesses) on a piece of paper.
- Test the specimen against each of the Mohs minerals. The Mohs minerals are marked with asterisks *.
- If there is a Mohs mineral which it doesn't scratch and which doesn't scratch it, then they have the same hardness.
- Otherwise, determine between which two Mohs minerals the hardness of the specimen falls. (For example: Specimen # 16 is scratched by # 6* (H = 3) and all harder Mohs minerals; but it scratches # 12* (H = 2) and all softer Mohs minerals. Thus, the hardness of Specimen # 16 falls between H = 2 and H = 3.
- Assign a hardness number to your choice. (For example: Specimen # 16 can be assigned a hardness greater than 2 but less than 3, such as H = 2.5.)
- After you have finished testing, return to this page. Enter your results in the 'interactive' Answer Checking Table (see the purple button below) to see if they are correct
- If they are correct, record the mineral specimen numbers and their Mohs hardnesses in Part C of the HARDNESS EXERCISES WORK SHEET (MN-3).
NOW THAT YOU'VE READ THE INSTRUCTIONS, CLICK ON THE GREY BAR BELOW AND....
 | Go to the Answer Checking Table |
|  |