Art Department - Fall 2026 - Digital Art - Ronaldo Kiel
ARTD 2822 - 3D Character Design - The Illusion of Life
Code: 24975 Section: TQ2L - T 02:15-05:55PM - 5102 BH - Jan 27 to May19, 2025
Course Description Class Projects Schedule Important Dates Contact Index
This class is divided into four projects, but you only have three assignments. All assignments should be uploaded as video clips, compiled in After Effects, or simply saved from QuickTime Player.
Class assignments must be uploaded by the due date to be consider for full grade. Please refer to the schedule page for the deadlines of the assignments. We will use the assignments page on the Bright Space class site for uploading assignments.
The four projects for this class represent distinct stages in the design and production of a short animation featuring a Talking Head.
Project1 Assignment - Turntable animation of your finished model
Develop a portrait or generic creature head and render one turntable animation. The minimum duration is 120 frames.
Resolution: HD540
File Format: QuickTime
Frame Rate: 24 fps (minimum duration: 120 frames)
Note: You can save a Play Blast QuickTime file in Maya. No need for Arnold software render.
Project2 Assignment - Turntable animation - Software Render (lights and textures)
Develop the look of your character’s head by painting your textures and creating materials. Develop the necessary shaders in Maya and render one turntable animation of your character’s head in Maya. The animation should be rendered in Arnold. For that, you will need to set up an IBL (image base light) or any other light setup.
Project3 - Rigging
Ptoject 3 does not have an assignment, but without a rig, you will not be able to make the Talking Head (Project 4 Assignment).
Project4 Assignment - Talking Head
This is the end of our course. You will upload a short animation of your character’s head talking. You can use key frame animation or facial motion capture.
Duration: Variable (audio file)
Resolution: HD540
File Format: QuickTime with audio
Frame Rate: 24 fps
__________________________________________________________________________________
I organized a step by step narrative of the ARTD 2822 class:
Project 1: You’ll design and produce a head for a character. The initial phase involves modeling. I allocated five weeks to this phase. You’ll need to dedicate approximately four additional hours per week to complete this project.
Modeling for deformation is a specialized technique that works best when using quads (polygons with four sides) and strategically placing edge loops that flow seamlessly with the main features of the surfaces you’re modeling. In this specific case, edge loops around the eyes and mouth will enable the eyes to blink and allow your character to speak.
There are two main techniques to model characters. The traditional modeling method and the sculpting method.
In the traditional method, polygons are placed in 3D space based on the main features of a character using extrusions and other operations to create the surfaces. This process is slow but provides a high degree of control over the modeling phase. The use of quads and the density of the mesh can be easily controlled throughout the process.
The sculpting method allows for the artist to focus on the creative process, but later the model has to be retopologized for rigging and animation. You start with a hight density mesh and sculpt your model adding and removing material as you would with clay. Sculpting programs like ZBrush and Mud Box provide very popular work-flows. The most appealing aspect of this technique is to be able to concentrate on the creative process right at the beginning. But later, the re-topology is time consuming, technical, labor intensive and necessary if the model will be rigged for animation.
In this course we will use the traditional method. (The sculpting method is covered in the ARTD 2821 Digital Clay class.)
You will create a polygonal model of a head from photographs or sketches (one frontal and one profile). The photos might have to be adjusted in Photoshop for the facial features to align properly. We will be using the traditional modeling method to create this head. If you decided to work from sketches of a character from your imagination please present the drawings to me before you start modeling.
After placing your image planes in the Maya scene you will start to create the facial features taking in consideration the flow of the edge loops around the eyes and around the mouth. From the side view you will draw the profile of the head using the “create poly tool”.
The rest of the face and the cranium are simple meshes to build, just keep in mind that you should be working with quads. There will be poles (vertex with more or less than 4 edges connected to it), try to hide the poles or at least place then in areas that will not have to deform very dramatically during animation.
Poles can be used to redirect edge flow, therefore position poles in places that will help with the modeling process and do not interfere with deformations. Poles are the result of 3, 5 or more edges connect to one vertex. Please take a look at topologyguides.com
I recorded nine videos that document the entire modeling process of a character’s head, including the specific features needed for this animation project, such as the teeth and tongue.
It will take a bit over an hour to watch this entire play list. But if you are interested in Polygonal Modeling, you should try to follow the videos and bring your questions to class.
• 2822_Projec1_Modeling_01_SetUp
• 2822_Projec1_Modeling_02_PlaceHolders
• 2822_Projec1_Modeling_03_EyelidsMouth
• 2822_Projec1_Modeling_04_HeadVolume
• 2822_Projec1_Modeling_05_Ear
• 2822_Projec1_Modeling_06_Connecting
• 2822_Projec1_Modeling_07_InsideMouth
• 2822_Projec1_Modeling_08_GumsTeethTongue
• 2822_Projec1_Modeling_09_ModelingEnd
• 2822_Projec1_Turntable_10
To finish Project 1 you will have to create a turntable animation (minimum duration: 120 frames).This is a very good way to evaluate your work and the goal of the first project.
In Maya from the Animation menu set: Select Visualize -> Create Turntable, open the options and set the number of frames to 120.
__________________________________________________________________________________
Project 2: At this stage, you have the option to work on rigging, textures, or even both simultaneously. Personally, I find it more beneficial to begin with textures. The initial step involves creating the UV layout for all parts of your model.
UV Mapping video: 2822_Projec2_UV_Mapping_11
Maya has UV tools that alow you to create the UV layout, and with the integration between Maya and Mud Box, texturing your character can be lots of fun. The textures, most likely, will be further worked in Photoshop; sometimes, Illustrator can also be useful in this process. If you prefer Substance Painter, feel free to use it. In this class, I created the textures using Substance Painter.
Substance Painter has introduced new workflows that make the “Photoshop” methods appear somewhat basic. However, the integration between “Substance” and the renderer (Arnold) in “Maya” is not straightforward.
Once you import your head geometry into Mud Box, you can continue refining your model in a high-resolution mesh and export displacement map, color maps (textures), and normal or bump maps.
I find it very effective to sculpt detail on the model created in Maya (with UVs) in Mud Box and extract the displacement map to use in the development of the shader in Maya. The color maps and other textures, I develop in Substance Painter. This approach enables me to create detailed low-density mesh models, which are frequently required in production.

This image displays the Low density model with and without displacement.
The use of displacement maps from Mud Box works exceptionally well in Maya and Arnold. The displacement maps calculated in Mud Box and integrated into the Maya shading network work in real time in the Maya viewports, adding an extra layer of detail that cannot be achieved otherwise.
While you don’t need to utilize the sculpting capabilities of Mud Box for this project, if you’re interested in exploring the creation of displacement maps, feel free to ask, and I’ll guide you through the process. I’ve also recorded a video demonstrating this process.
Displacement Video: 2822_Project2_Texturing_12_Displacement
Here are the steps to follow if you want to extract a displacement map:
1. From Maya, “Send to Mud Box” the low-res mesh.
You can work from your Maya file. Make a copy of the Maya file with UVs and name it Project 2. The easiest way to start is to use the “send to Mud Box” command. But before you do that, “Freeze Transformations” and “Delete all History”.
2. Increase the mesh density. On the Mesh menu -> Add New Subdivision Level (shift D) and sculpt the detail in a new layer.
3. Sculpt all the detail: This will be the hi-density mesh.
4. Extract the displacement map from Mud Box (bake displacement): The "Extract Texture Map Operation" is under the UV&Maps menu.
You can: Transfer Paint Layers or create Ambient Occlusion Map, Displacement Map and Normal Map in Mud Box.
On my class videos I just calculate the displacement. All the other maps, I will do in Substance Painter.
You have the low-res mesh that came from Maya. The hi-density sculpt that you just finished sculpting. And both share the same UVs. In Mud Box the baking of the displacement map is called “map extraction”. It is most often a 16 or 32 bit floating point file. We can use a TIFF file format.
You might want to start building your Shader in Maya at this point, to test the displacement that you created. The displacement map applied to the low-density mesh in Maya should look quite close to your detailed hi-res sculpt (and you do not need geometry with millions of polygons).
Maya Hypeshade displaying a shader network of a Lambert material with a displacement map.
This is be the start of your Maya Shader for the character.
Testing Displacement VIdeo: 2822_Project2_Texturing_13_Displace_Test
In Maya, we’ll create the shaders that will determine the character’s appearance. During this phase of your project, many decisions are art direction-related. You can opt for a more realistic look by using subsurface scattering, bump, or normal maps. Alternatively, you can develop an “illustration look” using hand-painted textures and/or Toon Shaders.
Artistic Styles and Art Direction Discussion Video: 2822_Project2_Texturing_22_References
In the subsequent phase of Project 2, I will employ Substance Painter to introduce geometry maps and Physical Based Rendering (PBR).
Vertex Color is used to facilitate the workflow in Substance Painter. During the Baking process, Vertex Color from Maya will be converted in color IDs.
It is also useful to know that "Maya Materials" will generate "Texture Sets" in Substance Painter.
"Color IDs" in Substance Painter. (Vertex Color from Maya)
Vertex Color from MayaVideo: 2822_Project2_Texturing_14_Vertex
Not only the color maps (textures) will be created in this part of the process, also geometry maps will be baked.
The process of generating geometry specific maps that will aid the texture creation like curvature and thickness maps is called "baking".
Geometry maps can be calculated from one single mesh or comparing the low and the hi-density meshes. Maps like Displacement (also called Hight Map in Substance) and Normal have to be calculated comparing one low-res model and one hi-res model sharing the same UVs.
Your low-res model with UVs from Maya is done. (Project 1)
If you did the extra sculpting in Mud Box to create the displacement map (erlier on this page), you already have the hi-density mesh. You can just use a saved FBX version of the Mud Box file. This is the hi-density model.
It is time to work on the texture set in Substance Painter. We will bake the geometry maps and generate the Texture Set for your character's head.
This Texture Set has 8 maps.
Steps to follow to set your Substance Pinter workflow:
You can work from one mesh but if you want to calculate some of your bakes comparing 2 meshes like we did in Mud Box to extract the displacement, you will need two FBX files. One with the hi-res from Mud Box and one low-res mesh from Maya.
Exporting from Maya the FBX requires that the "File specific options" under Geometry, don't have the Smooth Mesh option checked. UNCHECK IT if it is on.

Substance Painter will import Maya Materials (Shaders) as Texture Sets. I recommend that you use only one material in Maya to simplify the process.
During baking, Maya converts the vertex color into color IDs. This facilitates the isolation of specific model parts into layers, which simplifies the texture creation process.
The layer system in Substance Painter looks very similar to Photoshop but it has much more functionality and it is more complex to work with.
Some useful details of Substance Painter workflows will be discussed in class.
Here are videos to help you with the Substance Painter work:
Substance Prep Work Video: 2822_Project2_Texturing_15_Substance_Prep
Substance Intro Video: 2822_Project2_Texturing_16_Substance_Intro
Before you can texture your character you will have to bake the geometry maps.
Here is a video about baking: 2822_Project2_Texturing_17_Bake
Working with Layers: 2822_Project2_Texturing_18_Subs_Layers
After you finish texturing. Export all maps at the desired resolution and build the Shader in Maya.
Here is a 5-minute video on exporting textures: 2822_Project2_Texturing_19_Export
Finalize Project 2 in Maya: Create our Shader network. And render the Turntable.
Building of the shader network and setting lights in Maya is in this 10-minute video: 2822_Project2_Texturing_20_Shader_Lights
A Turntable Animation is a very good way to evaluate your work. This is the end of Project 2.
In Maya from the Animation menu set: Select Visualize > Create Turntable option and set the number of frames to 120.
Here is the video on how to create the Turntable: 2822_Project2_Texturing_21_Maya_Turntable
Final Rendering specifications:
Duration: minimum 5 seconds (120 frames)
Resolution HD540
File Format: QuickTime
Frame Rate: 24 fps
___________________________________________________________________________
Rigging and Animation
Project3: To bring our animated talking head to life, we need to build a digital puppet head. We’ve already worked on its appearance, modeling a mesh and creating a shading network that can change shape in real time. Now we need to bring it to life. To animate it, we’ll need to transform the mesh over time.
We’ll achieve this by using two deformation systems that can accept keyframes. These key positions can be motion-captured using the face recognition on the iPhone and software to connect Maya to the iPhone, or manually set on controllers (that need to be created).
If you plan to animate using MoCap follow the Project3_A description below. For MoCap, you do not have to create controllers but you will have to set the joints and many blend shapes. If you decided to use controllers follow the Project3_B description.
Facial rigging can be incredibly complex, depending on the project you’re working on. A character for a game might not need a sophisticated rig like the one used for characters in animation or movies. Games typically use bone deformations, while film productions might require a combination of multiple deformation systems to provide animators with complete control over facial expressions. In certain cases, you may need to add Mel scripts to achieve the functionality required for specific controls.
Project3_A: Rigging for MoCap
This rig will use Joints and Blend Shapes.
I have been experimenting with Motion Capture using the iPhone frontal camera and iFacialMocap software to connect the phone and Maya.
You can record animations in real time by screen recording the Maya viewport, or transfering motion captured data, to Maya as key frames and later render in Arnold your animation.
With a minimum amount of rigging and no need to create controls, you will be animating using your face expressions and head movements to drive the character's head. You can also use the sound recorded while the motion capture is occurring.
The MoCap approach brings up a new challenge for the animator. The animator as an actor.
If you name your Joints and Blend Shapes according to the Apple ARKit convention you will start to receive input from the phone as soon as you establish the connection between the iFacialMocap software running on the phone and the Maya module of iFacialMocap in your computer. This will only work with phones equipped with a frontal camera capable of FaceID.
Here are the steps to rig this project for MoCap.
Start by creating the joints:
1. Joints for the eyes, neck, head and spine. To keep the default names use:
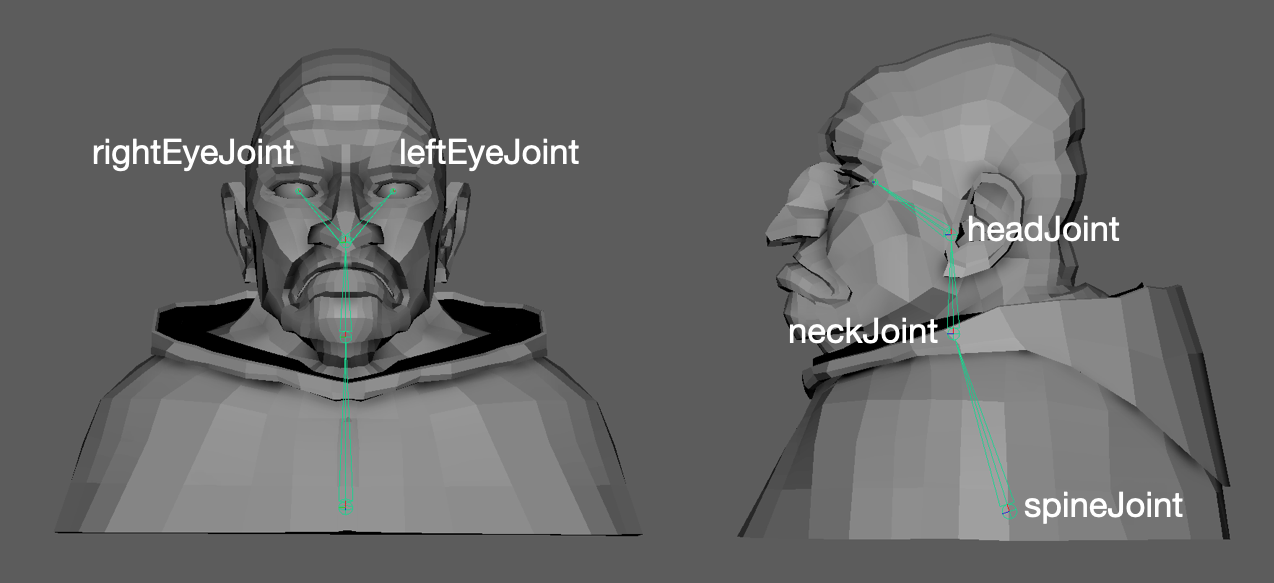
2. Skin> Bind the Skin open the options.
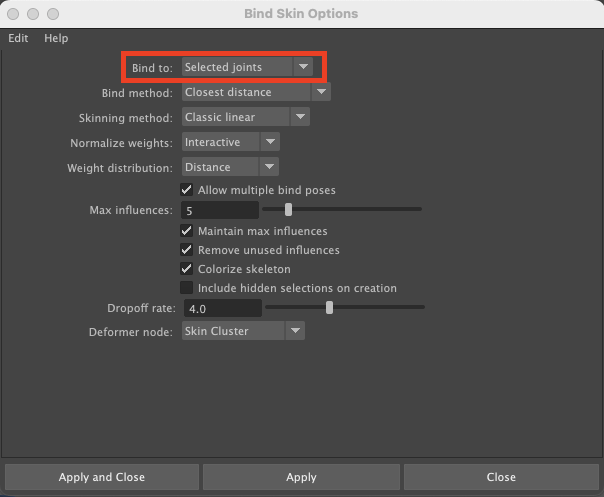
If you have combined your geometry, you can just select the model and shift click on the spineJoint to bind the skin.
If you have all parts of your head separated under one group. When you bind the skin Maya will create skin clusters for each piece of geometry you have. In the Bind Skin Options under " Bind to: " you can select "selected joint" to isolate the influence of a specific joint.
The eyes will need to be skinned to the eye joints. But the teeth, the tongue and any other geometry, that needs to move with the head mesh, can be skinned to the headJoint. Scalp and other base geometry for facial hair can be "wrap deformed" to the head geometry).
Bind Skin Video: 2822_Project3_Rigging_23_Bind_Skin
3. Paint Skin Weights: I used a hierarchical way of transferring weight.
Skin Weights: 2822_Project3_Rigging_24_Skin_Weights
You will not need an animator's user interface because animation will be performed and recorded with MoCap.
4. Blend Shapes: The time consuming part of this approach is the creation of the Blend Shapes. Here are two places where you can see all Blend Shapes in the apple ARKit.
Ultimate Guide to Creating ARKit 52 Facial Blendshapes
https://hinzka.hatenablog.com/entry/2020/06/15/072929
The apple ARKit includes 52 blend shapes. You don't need to create all 52 blend shapes. But some jaw and mouth shapes will be important as well as eye blinks.
Here is a link with some information about how to work with Blend Shapes. https://www.yellowbrick.co/blog/animation/blend-shapes-and-morph-targets-in-maya
I created one Blend Shape and 26 targets following Apple's ARKit.
Here is the breakdown of the target shapes.
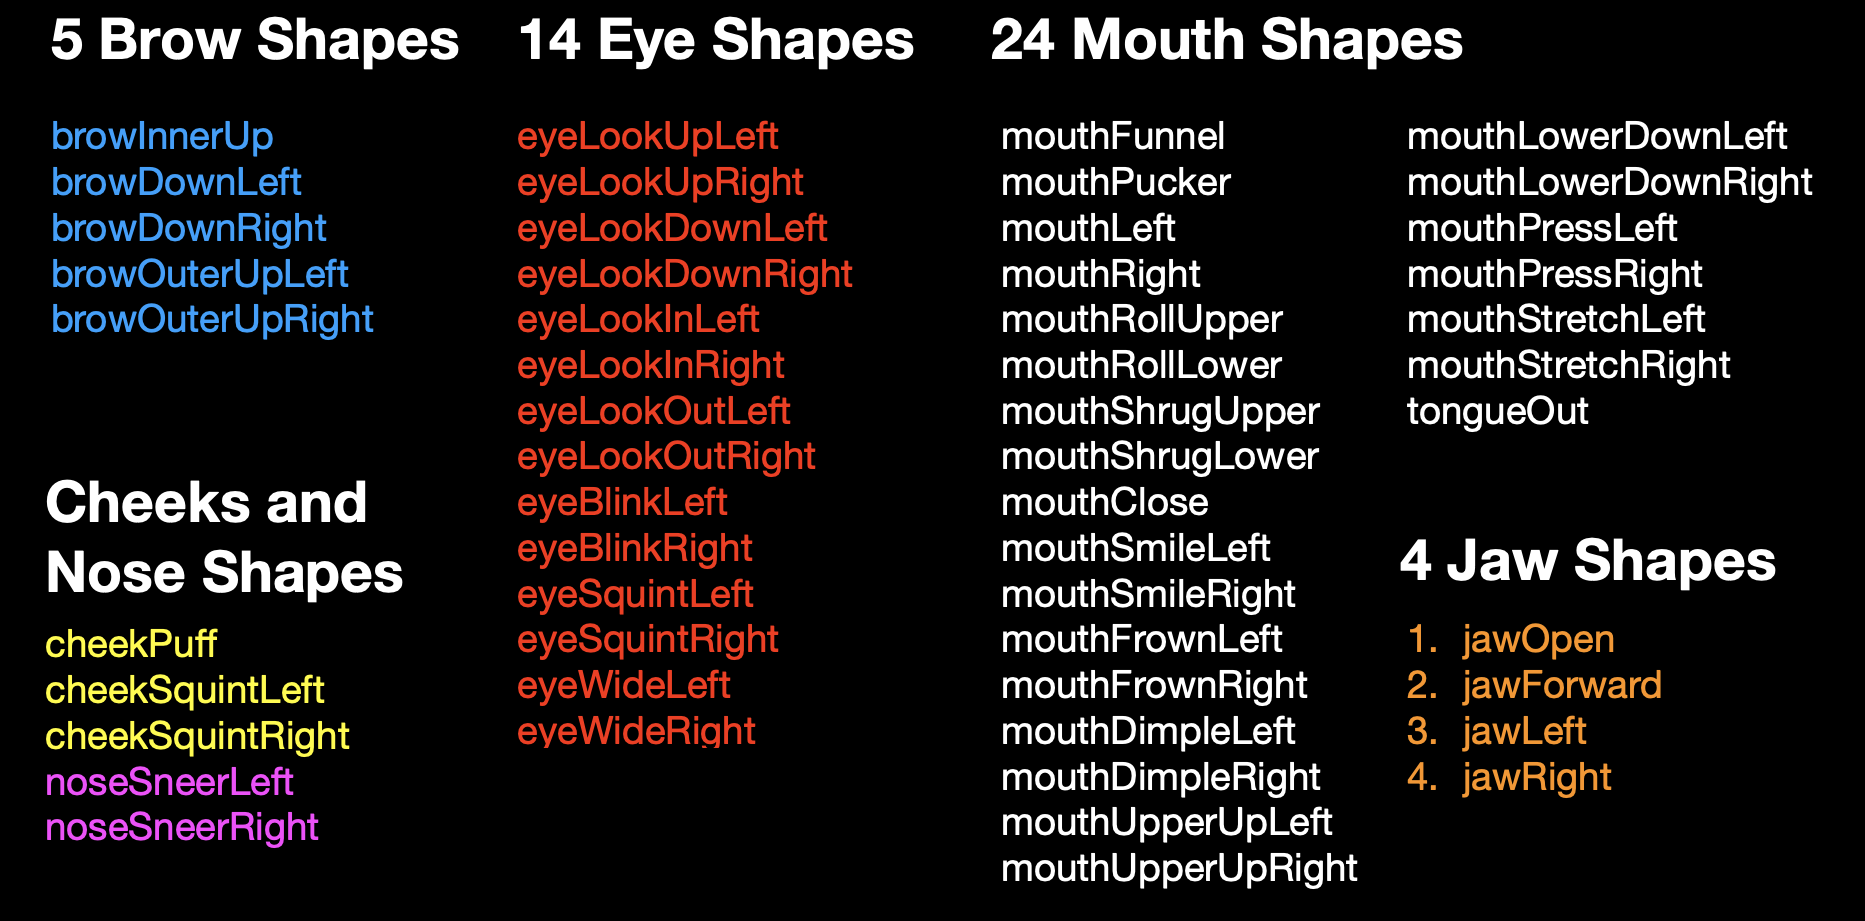
All these target shapes receive motion capture from the IfacialMocap software on the iPhone.
I created 28 of them for the file I use to record the class videos. Depending on your character, you might be able to work with fewer.
| 1 | browInnerUp | ||
| 2 | browOuterUpLeft | browOuterUpRight | |
| 3 | browDownLeft | browDownRight | |
| 4 | eyeBlinkLeft | eyeBlinkRight | |
| 5 | eyeLookDownLeft | eyeLookDownRight | |
| 6 | eyeWideLeft | eyeWideRight | |
| 7 | cheekPuff | ||
| 8 | noseSneerLeft | noseSneerRight | |
| 9 | mouthSmileLeft | mouthSmileRight | |
| 10 | mouthUpperUpLeft | mouthUpperUpRight | |
| 11 | mouthLeft | mouthRight | |
| 12 | mouthRollLower | ||
| 13 | mouthFunnel | ||
| 14 | mouthPucker | ||
| 15 | mouthClose | ||
| 16 | jawLeft | jawRight | |
| 17 | jawOpen | ||
| 18 | tongueOut |
Blend Shapes Video 1: 2822_Project3_Rigging_25_Blend_Shapes1
Blend Shapes Video 2: 2822_Project3_Rigging_26_Blend_Shapes2
Project3_B: Creating Controllers
Traditional animation methods for lip-syncing require specific Blend Shapes (not on the Apple ARKit). Moreover, the rigs used for keyframe animation differ significantly from those employed in motion capture. The videos below demonstrate a head rigged for keyframe animation.
Key-framing your character’s acting involves an entirely distinct process. In some level, it will come from the work on the face expressions develop as Blend Shapes.
Keyframe Animation requires a very specific skill set that certainly can be developed with time and dedication. This course is designed to give you an overview of the workflow in character creation and the testing of the rig in a short animation using motion capture. Specific animation courses will be necessary if you wish to become an animator.
To develop rigs for Keyframe Animation, collaborate with the animator to ensure the rig possesses the functionality necessary for the character’s performance. In the example I created for the videos in this section, there are controllers, and a completely different set of Blend Shapes. Below are the steps to create a rig for key-framing.
• Joints for neck, head, and eyes. (same as Project3_A)
• Bind the Skin (same as Project3_A)
Note: The scalp and any other base for facial hair can be wrap deformed to the head geometry.
• Paint Skin Weights (same as Project3_A)
• Create the User Interface.
• Controllers - User Interface for animators. This intro video might help: https://www.njvid.net/show.php?pid=njcore:183175• Connect Controllers to the Joints
• Create controller hierarchy
The animatotor's UI (user interface) can be reused, therefore the development of quite complex UIs is common on large productions.
The acting of you character will depend on how much control your rig will provide. Before you create the blend shapes, you should look for references. Look for images of facial expression or sketches of characters’ faces expressions to use as reference.
Preston Blair's "Dialogue" lists nine distinct face expressions (front and profile) that can be used for simulating the phonemes employed to create the illusion of your character speaking.
Techniques to create "set driven keys" and blend shapes you can take a look at https://www.njvid.net/show.php?pid=njcore:183174 (eye blinks).
There are a few videos about rigging and how to create cotrolles here:
Basic joints and skin weights
20:31
Controls for the head
04:07
Eye Controls
15:40
Blend Shapes
15:47
Eyes and mouth expressions
07:35
Connections
Before you start animating, render a series of stills to test camera angles lighting and textures.
_________________________________________________________________________________
Some notes on facial animation
For lip-syncing, think about the entire face while focusing on the mouth. The face can be treated as a elastic mass if you created enough controls in your rig.
During the animation process, imagine a traditional puppet where the only control you have to make the puppet talk is the up and down movement of the chin. Remember the Muppet Show?
To block out the mouth shapes, start by creating jaw drops for all the sounds in your dialogue that require an open mouth. Blend shapes can then be used to better define the movement.
Refer to Preston Blair’s “Dialogue” (page 35) for more information on mouth shapes used for lip-syncing. Blair compiled these shapes in his publication “Advanced Animation". If you have Richard Williams The Animator's Survival Kit read the chapter "Dialog" (page 304).
The camera should be focused on your talking head, and avoid moving it. If you decide to move the camera, keep it simple. You can also use multiple cameras and switch between shots, rendering them from different angles.
The audio clip you use will determine the duration of your animation. Your animation doesn’t need to be long. A clip of around 300 frames can have six or more sentences and more than 12 seconds.
NOTE: Before you commit yourself to a long rendering make sure you have already done as many test renderings as necessary to create your final animation.
Here are two sources of audio clips:
PacDV (free sound effects) - https://www.pacdv.com/sounds/voices-4.html
Voice Bunny (Browse samples) - https://voicebunny.com
_________________________________________________________________________________
Project4: Time to animate your character's head.
Reviewing some animation ideas, I’ve come to realize that animation utilizing motion capture from face recognition software falls under a very specific category. Dana Boadway-Masson’s article (published on March 9, 2021) might serve as a valuable starting point for further exploration in this area.
10 Advanced Acting Performance Tips for Animators
I’ve linked two motion capture animation tests: One test involves a real-time screen recording from the viewport, while the other test uses a keyframe recording that is later rendered in Arnold.
CCNY character - Keyframe and Arnorl Render
The iFacialMocap software I used allows you to transfer the motion captured data as keyframes. In Maya, you can edit the animation using the Graph Editor.
Alternatively, you can simply screen record from the Maya viewport. You can also transfer the audio file recorded during the session.
Your assignment 3 is to upload your animation.