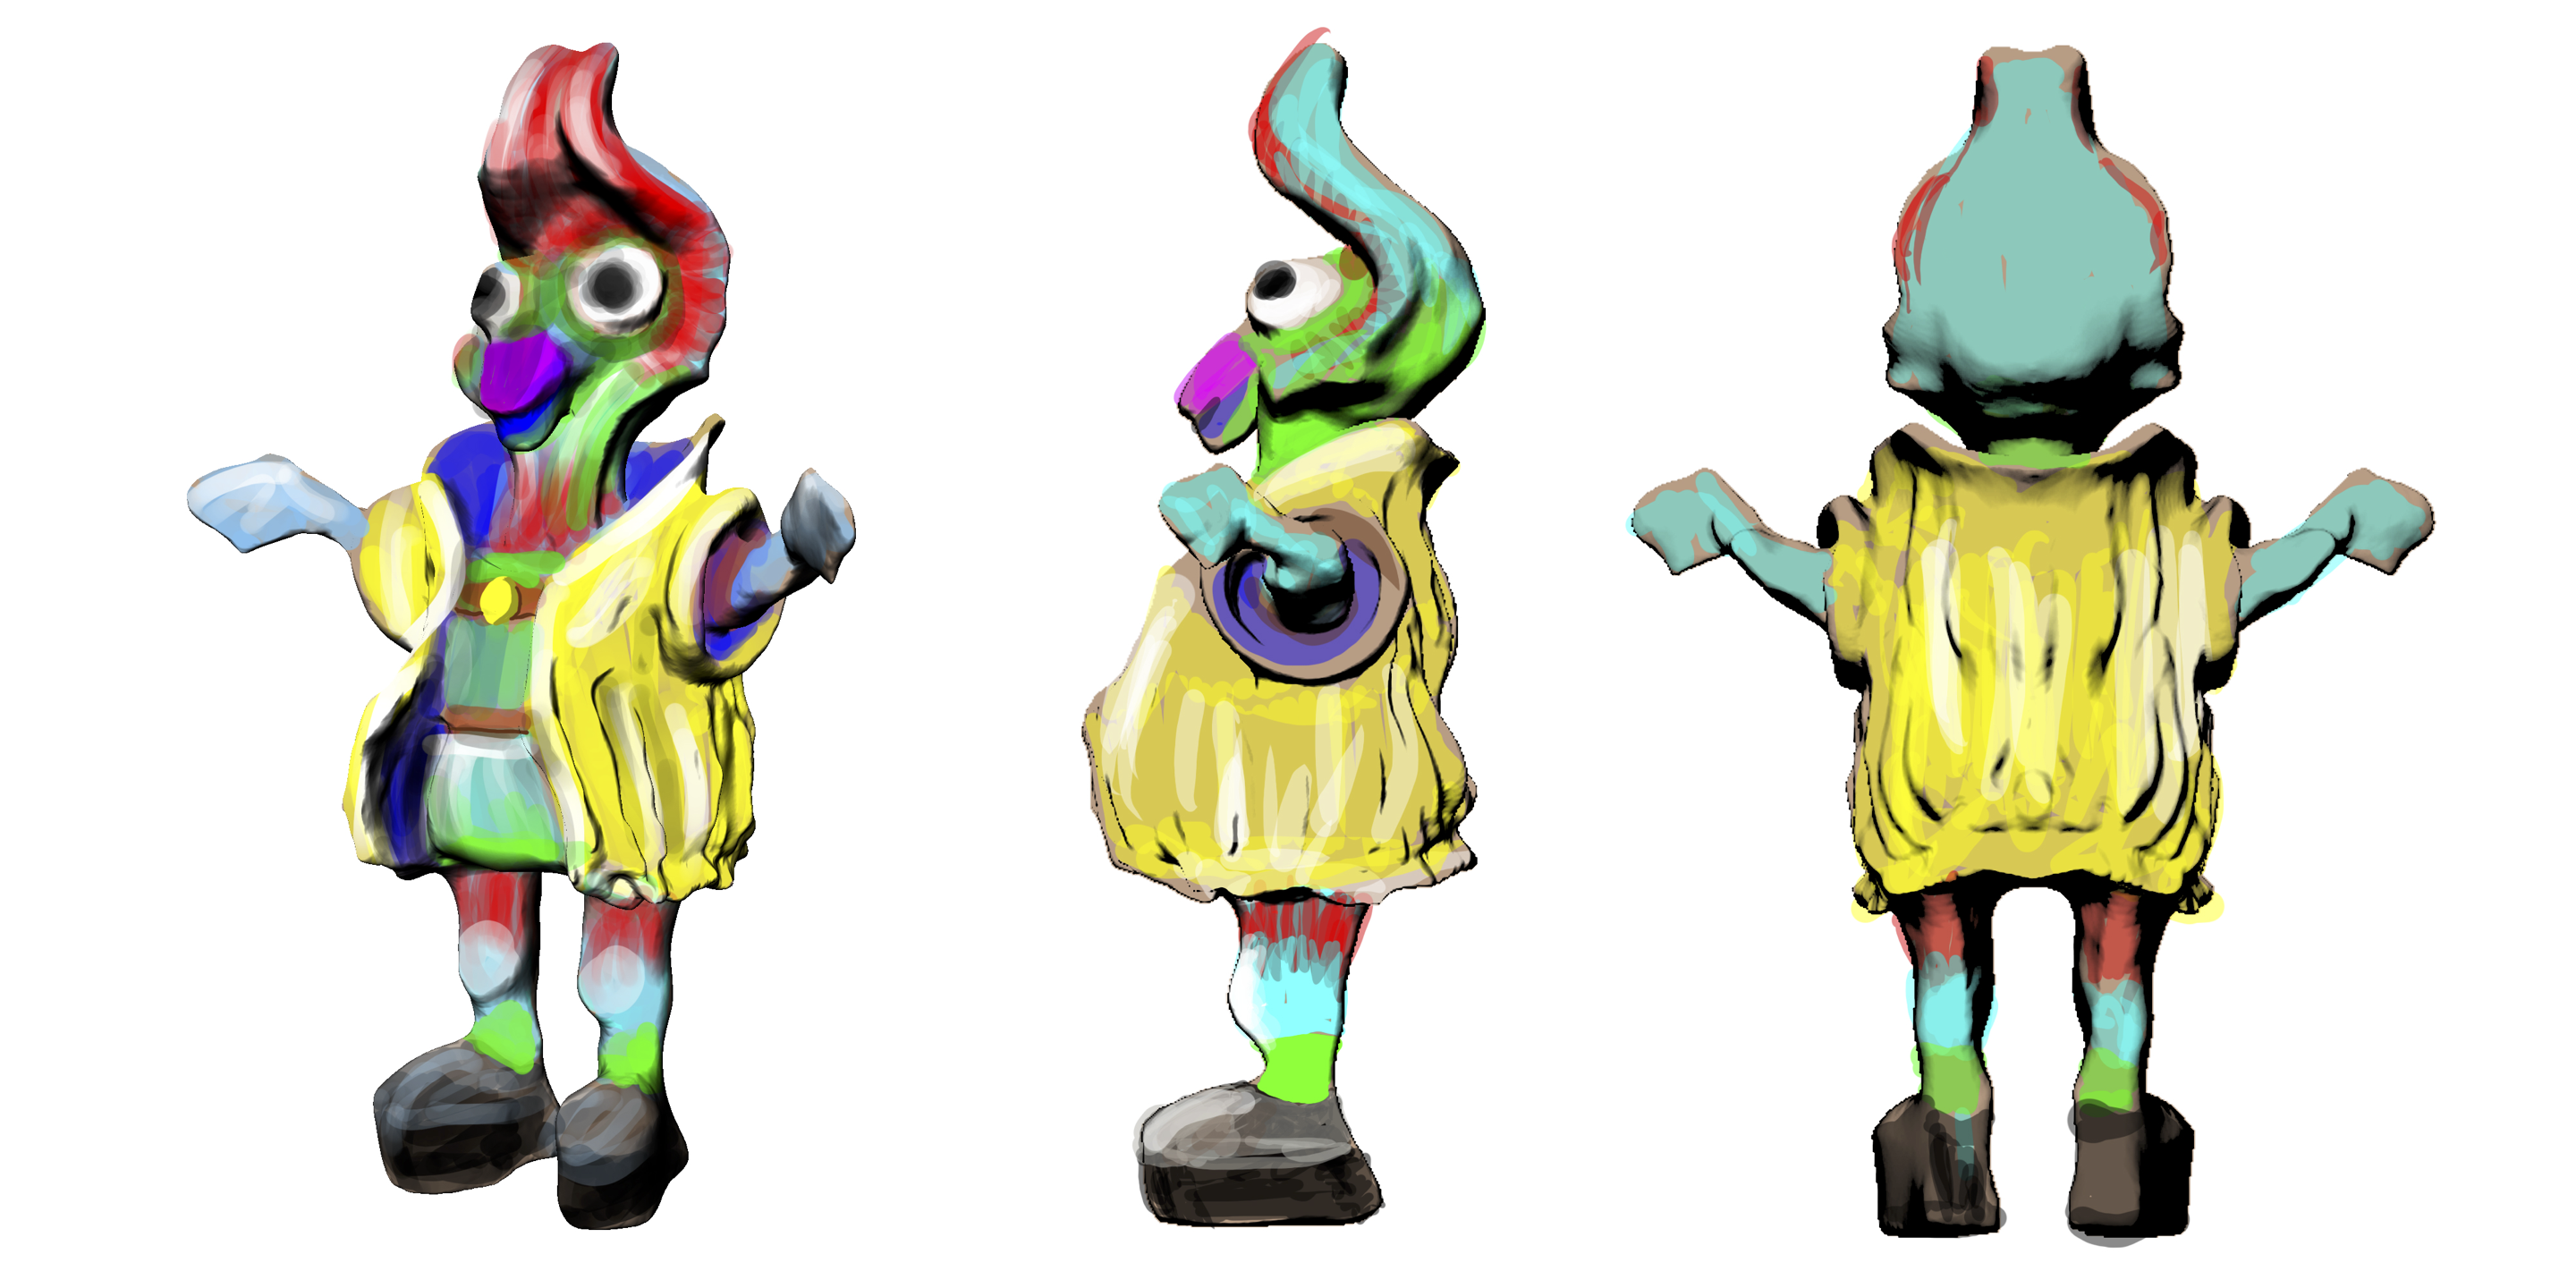
This is one of the art boards I created for the asset I developed for this class.
Art Department - Spring 2026 - Digital Art - Ronaldo Kiel
ARTD 2823 - Digital Clay - 3D Sculpting and Modeling
Code: 18804 Section: TQ8L - T 08:55-12:40PM 5102 BH - Jan 26 to May 19, 2026
Course Description Class Projects Schedule Important Dates Contact Index
The four Digital Clay Projects represent four distinct stages of development and production for a 3D asset.
Project 1: Sculpt from your imagination - 3D sketches to create 2D Concept Art
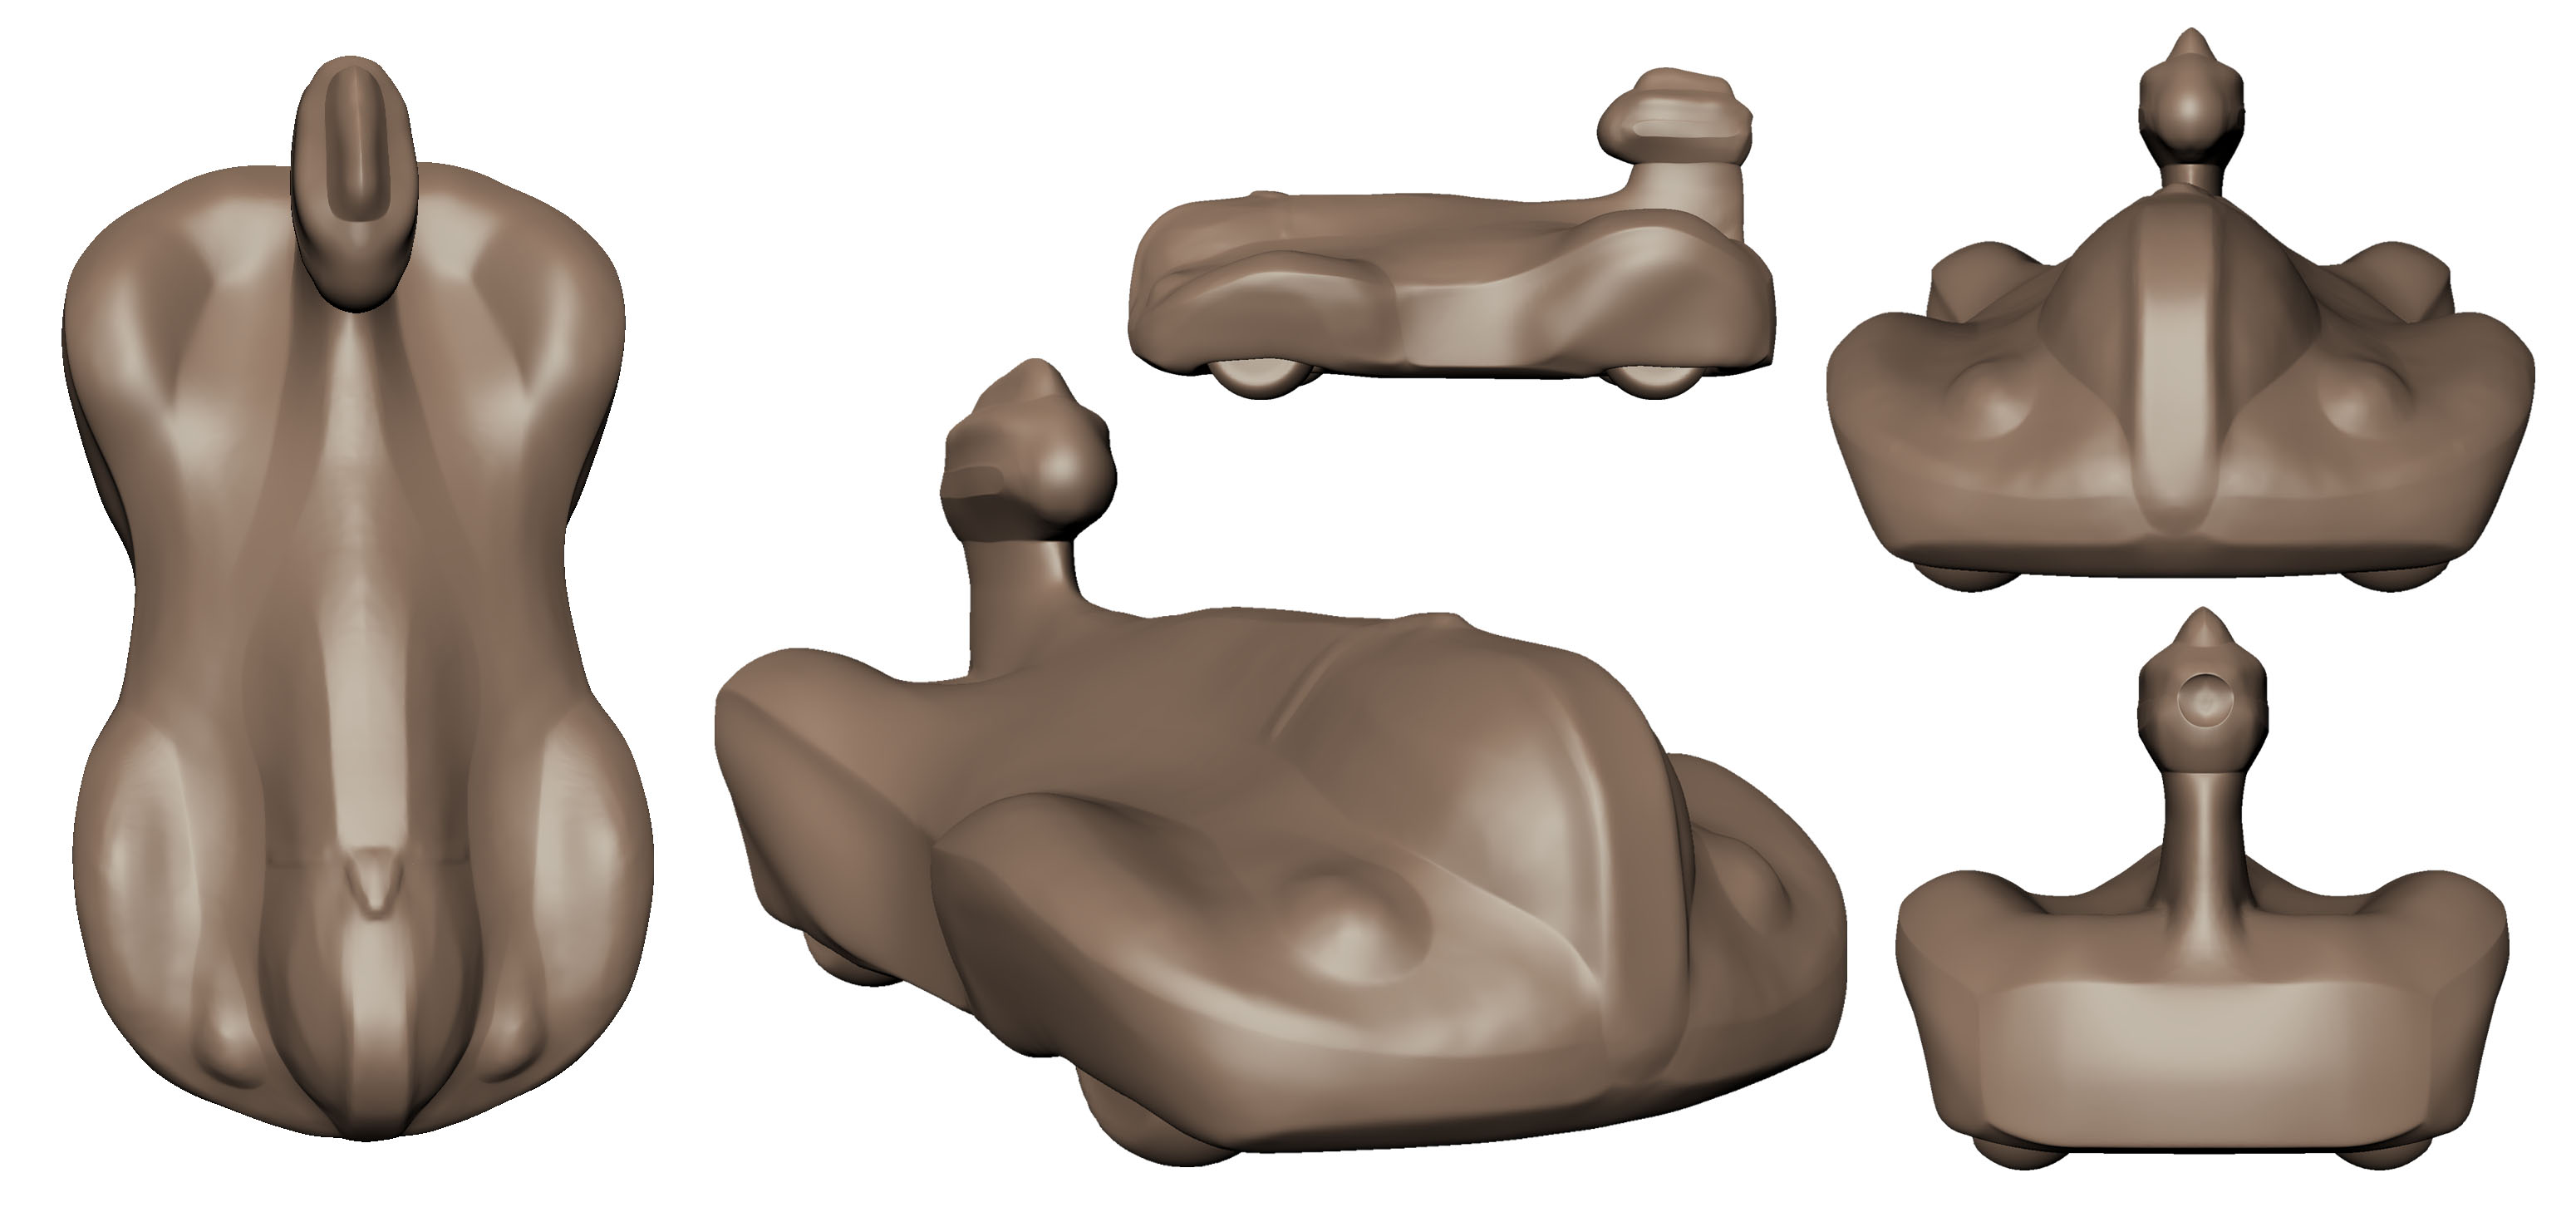
Starting from one of the default Mud Box meshes, sculpt some ideas for a 3D asset. Mud Box offers several default meshes, such as Bull, Car, Cube, Human Body, Basic Head, Plane, Sphere, and so on. You can also model basic forms in Maya and use the “send to Mud Box” command. Proper placement of edge loops will facilitate the sculpting process.
For instance, you could model a character head from a Mud Box Sphere, but it’s likely easier to create it using the Mud Box Basic Head mesh or a basic model made in Maya. If you’re planning to use Blender, be mindful of the sometimes challenging task of designing workflows that are both user-friendly and dependable.
You should experiment with a pressure sensitive pen. I have been using an old iPad connected via USB-C running Yam Pad. I hope to have Wacom tablets available for studio work in 5102. You can also bring yours. We might have to ask Mitch for help to set up.
Assets used in animations or game production begins with “sculpts” like yours.
The final step in this project is to create a 2D art board from your Mud Box sculpts for your class presentation. If you prefer, you can use traditional sketches, but I believe sculpting your ideas in Mud Box is an interesting way to begin your asset creation. Please make these sketches as detailed as possible using Procreate, Photoshop, or any other software you’re comfortable with.
Your Art Boards should present your Concept Art as appealing and informative as possible.
This is one of the art boards I created for the asset I developed for this class.
Art board for a Tin Toy Car asset, to be distributed as a USDx file.
You’ll be the artist who creates the 3D asset.
Next, we’ll discuss the scope of your project. Will it be a simple prop or a fully developed character? If you don’t have much time to dedicate to this class, keep it simple.
Please upload your work as PNGs to the Assignments page of the Bright Space class site.
There are many Mud Box videos on YouTube. Take a look at the links below if you have time.
https://www.youtube.com/watch?v=wxTt8xjsFgg
https://www.artstation.com/artwork/dy8681
Project2: Your Concept Art Used in Production - turntable from Mud Box
In Mud Box, work from your art boards, you can also continue to sculpt on the model that you use to create the concept art. Add detail like you did on your Concept Art boards. Or create a new "sculpt". This is the model that you will re-topologize on Project3.
I recorded a short video to help with Project 2: 01_2023_Project2_TurnTable
In Mud Box: Render-> Create Turntable Movie Resolution 1280x720

File Format: QuickTime
All other default settings are fine. Your assignment is to upload one turntable animation. Use the instructions on the Bright Space assignments page. Students’ work will be published from the Bright Space web site of the class on to the Yuja streaming platform.
Project 3: Asset Creation 1 - Re-topology - UV maps - Vertex Color - Maya Turntable
The most extensive and intricate segment of your course begins here. You’ll model a low-density polygonal mesh of your asset in Maya, create UVs, and assign Vertex Color (for Adobe Substance Painter).
The workflow I propose in this class will continue in Maya. We will re-create the mesh using the Quad Draw tool.
You’ll construct a mesh using polygons with four sides and strategically place edge loops to facilitate texture mapping, subdivision, and deformation if the asset will be used in animation.
The file from Project 2, your sculpted asset from Mud Box, is a very dense mesh tessellated in triangles and not usable UV map.
For production you will need a low-density mesh.
We will re-topologize the mesh using the Maya Quad Draw tool. You can start Project 3 from Mud Box and use the "send to Maya" menu command > as a new scene.
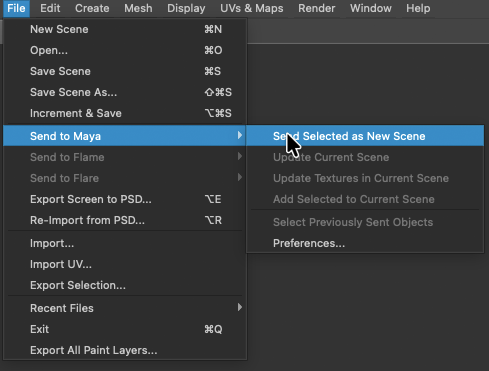
You can also export the Mud Box sculpt as a FBX file and bring it into a new Maya project. Remember to “Set” your Maya Project 3, and from now on, always use the file directory that Maya created.
02_2823_Project3_retopologize_Head
The use of the Quad Draw Tool ![]()
Re-topology is the process of simplifying the topology of a mesh to make it cleaner and easier to work with. By creating edge loops that follow with the general shapes of your sculpt, you will make the texturing more precise and deformations, in case of animation, possible.
You should address all other modeling details in this phase of Project 3. If you are working with a head: The eyes, teeth, tongue and any other clothing necessary.
The next three videos address all modeling needs for the Project 3 sample that I created for the class.
03_2823_Project3_retopo_details
It’s crucial to organize all the geometry, grouping and naming all model parts.
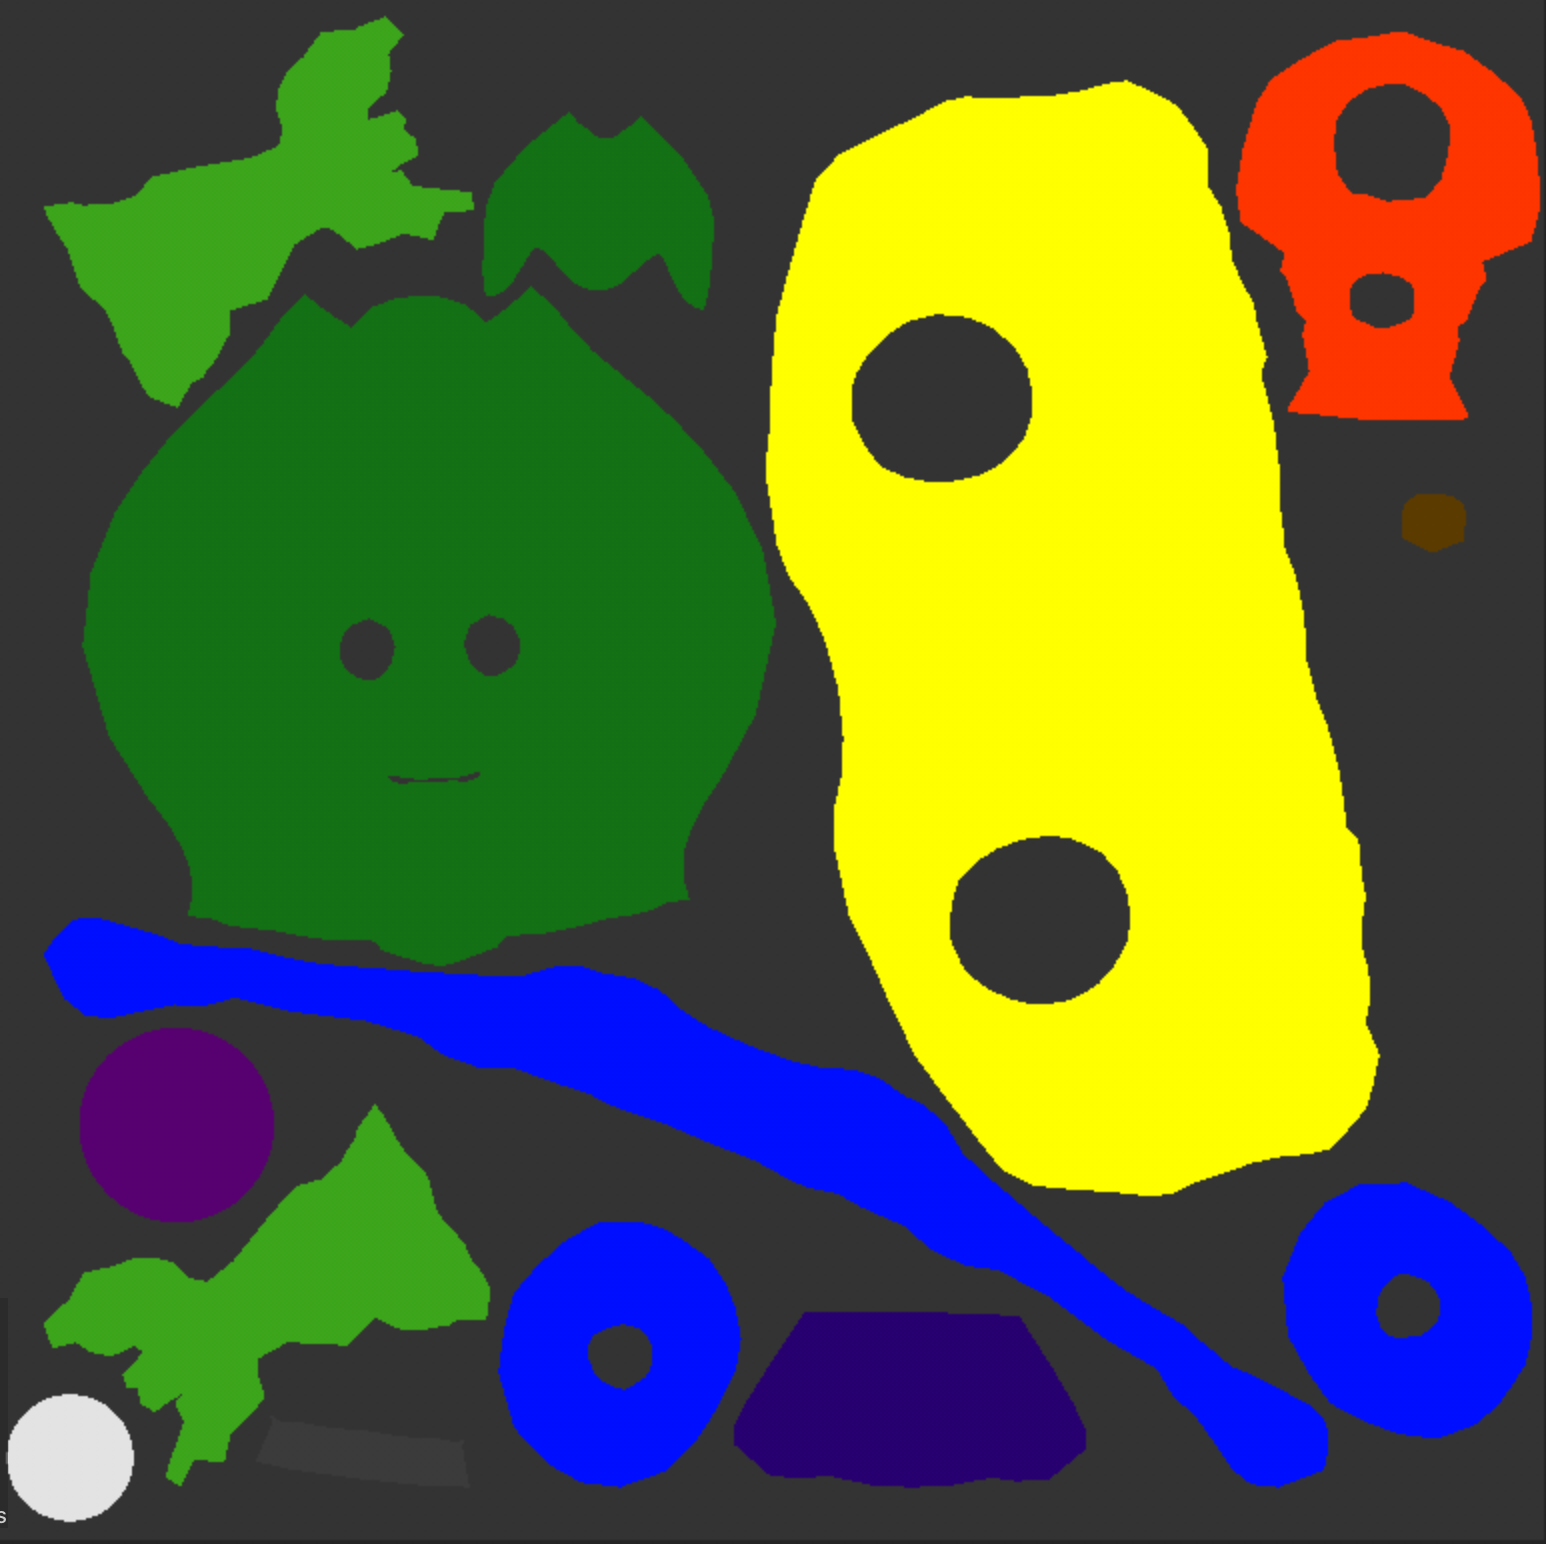
The next step is the UV layout. The UV layout should include all the model parts. You can use several UV tiles but the workflow will be more complex.
The Maya Materials (sometimes also called Shaders) at this point, are not important. But the UV layout is necessary to finish Project3.
You should only begin creating the UV map of your model after all modeling is complete. Additionally, DO NOT MAKE ANY CHANGES TO THE MODEL AFTER YOU HAVE CREATED THE UVs.
Your UV layout, vertex color, and the Maya shaders you use all play a role in the workflow in Substance Painter. I recommend assigning “vertex color” in Maya and using a single Maya shader.
The next video should help you to get started.
This is the UV layout of the file I used to record the video.

You have now the mapped UVs. The UV layout will make possible for you to 3D paint your asset.
The next step is Vertex Color During the baking process in Substance, Vertex Color from Maya will be converted into color IDs. These color IDs are then used to create layer masks. This workflow is what I demonstrated in the videos about Substance Painter.
If you have time, you should take a look at the video:
07_2823_Project3_Vertex_Color.mov
Color IDs in Substance Painter after baking.
Project 3 will be completed with a turntable animation created in Maya. This turntable animation should be rendered in Arnold.
You’ll need to set up your lights in Maya. The Arnold Render engine ignores the default lights in the viewport. In the next video, I used an image-based light (IBL). If you want to work with IBL, you’ll need an HDR image with a “sky dome.” Hight Dynamic Range Images in this particular application have to also to be Equirectangular Projection.
You can look for HDRIs at Poly Haven.
In Maya from the Animation menu set -> Visualize -> Create Turntable
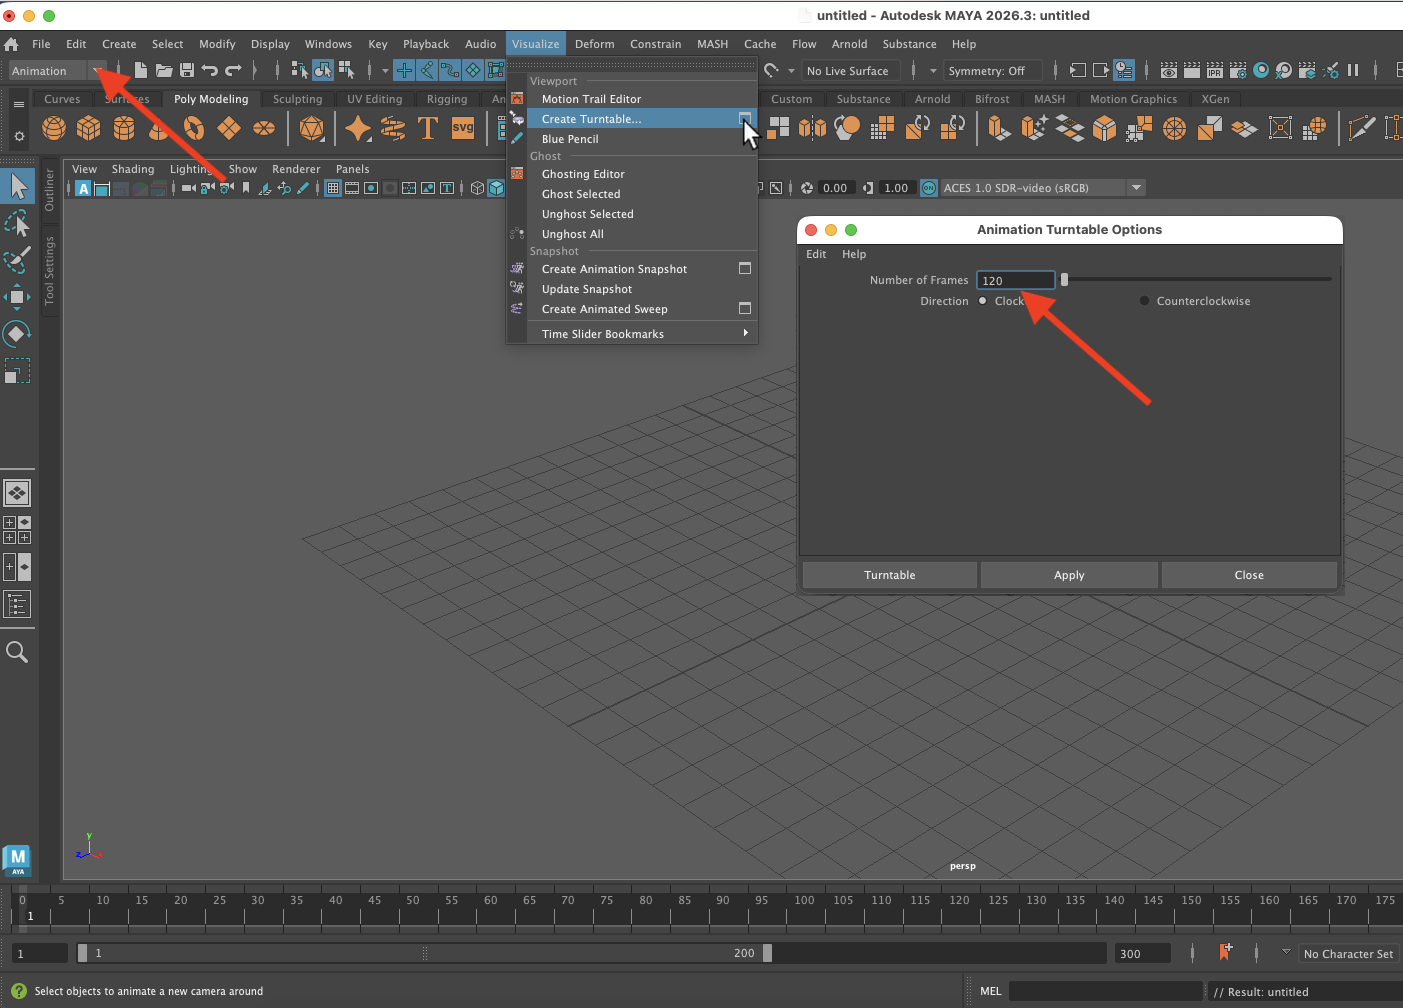
Final Rendering specifications:
Duration: minimum 5 seconds (120 frames)
Resolution HD540
File Format: QuickTime
Here is the video: 08_2823_Project3_Maya_Turntable.mov
The rendered frames in Maya, have to be compiled as a video clip.
You need to upload one QuickTime file, either compiled in After Effects or saved directly from QuickTime Player.
Please, upload your file with your name and Project#, along with the term and course code of the class on the file name.
File name example: Your_Name_Projec3_semester_year_ARTD2823
Note: You can create some texture maps in Mud Box. However, I’m hoping you’ll explore the possibilities of Substance Painter with me in project 4.
This is it. Project 3 is complete with a turntable animation from Maya.
__________________________________________________________________________________
There are 7 videos related to Project 3. The total duration of all clips is 47 minutes. Full 2823 Playlist
02_2823_Project3_retopologize_Head.mov
03_2823_Project3_retopologize_Head_Eyelids.mov
04_2823_Project3_Eye.mov
05_2823_Project3_Inside_Mouth.mov
06_2823_Project_UV_Layout.mov
07_2823_Project3_Vertex_Color.mov
08_2823_Project3_Maya_Turntable.mov
__________________________________________________________________________________
Project4: Asset Creation 2 - Displacement or Hight maps - Geometry maps - Physical Based Rendering
This is the final phase of your asset creation. In this phase, we’ll explore the development of geometry maps and textures using Mud Box and Substance Painter. These textures will be integrated into Physical Base Renderings (PBR) workflow. It might be beneficial to familiarize yourself with the history of PBR.
We’ll create the shaders that define your character’s appearance. Many of these choices are “art direction” decisions. You can opt for a more realistic look by incorporating subsurface scattering and bump or normal maps, or you can develop an “illustration look” by using hand-painted textures and Toon Shaders.
Not only the color maps (textures) will be created in this part of the process, also geometry maps will be baked.
The process of generating geometry-specific maps, such as curvature and thickness maps, is known as “baking.” These maps can be calculated from a single mesh in Substance Painter. Other maps, like displacement (also known as height map) and normal maps, are calculated by comparing one low-density mesh and one high-density that share the same UVs.
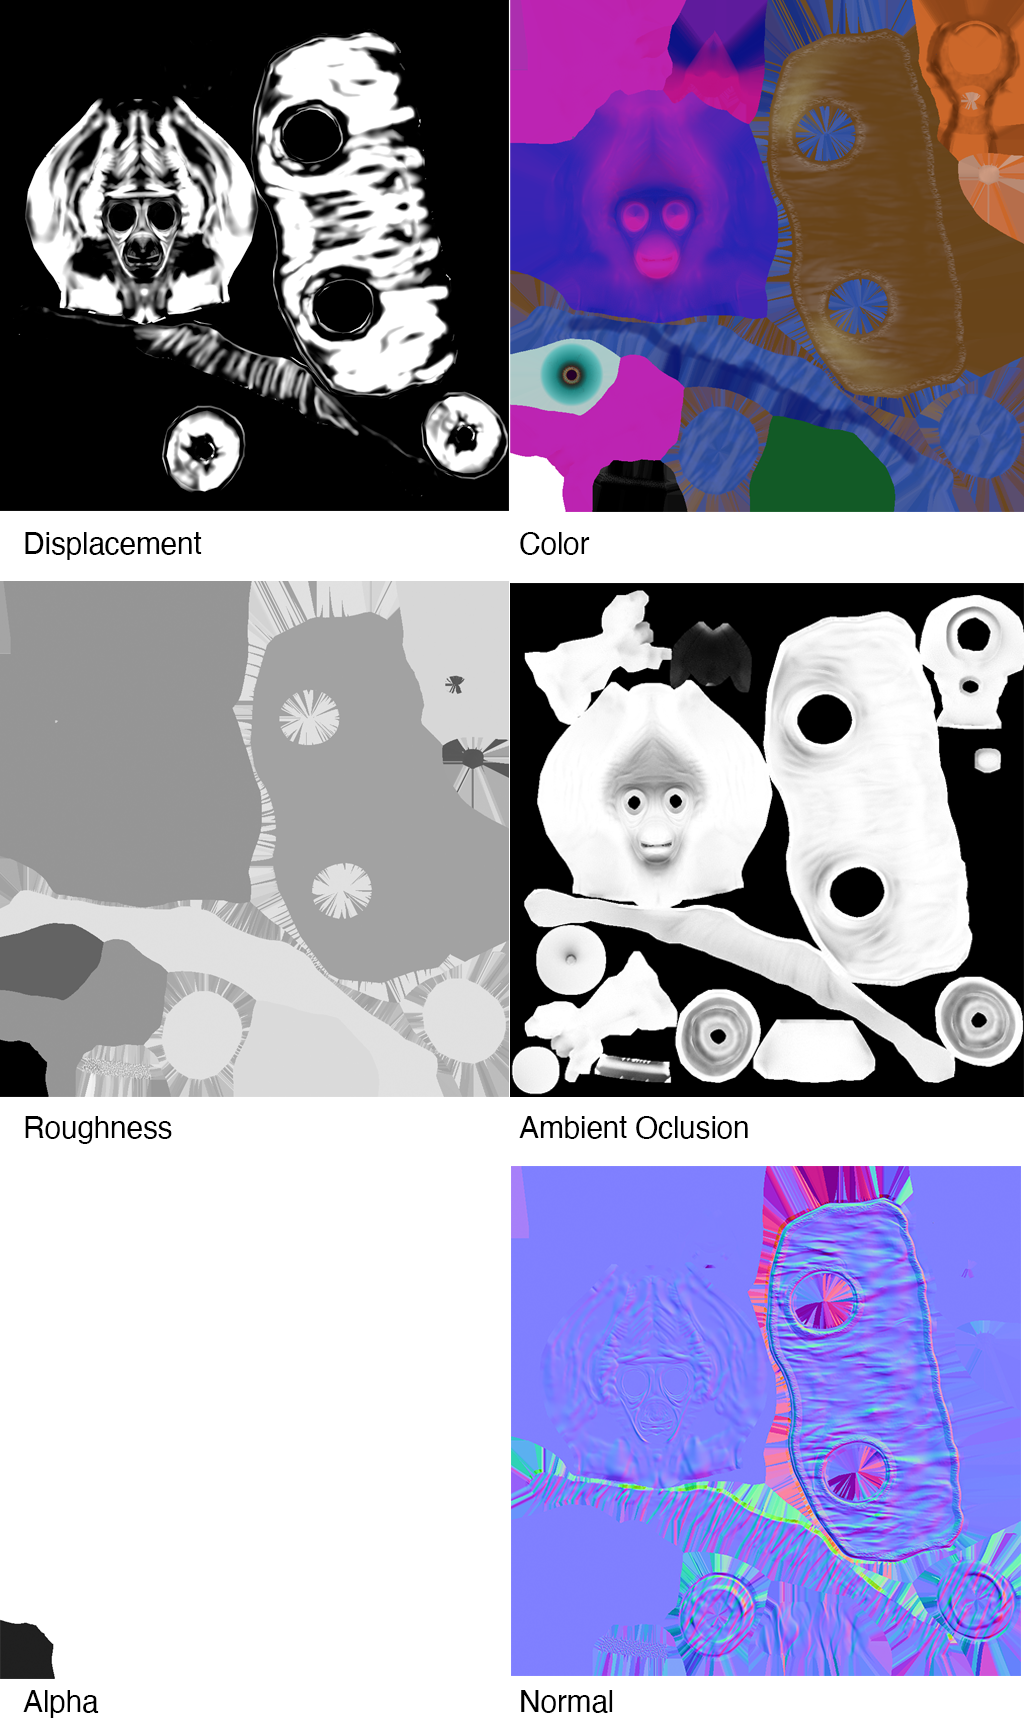
For the asset that I created for this class. I used one displacement map, created in Mud Box, and a texture set from Substance Painter with six texture maps.
Displacement Map Extraction in Mud Box: In this segment, we’ll continue working in Mud Box and Maya. This is the time to add all the intricate details you need to the re-topologized model from project 3.
Your low-density model with UVs is complete (Project 3). Now, let’s create the high-density version, including the detail necessary to give your asset a unique look.
1. “Send to Mud Box" the low-res mesh:
You can work from your “Project 3” Maya file. Make a copy of the file and name it Project4. The easiest way to begin is by using the “send to Mud Box” command. However, before you do that, “Freeze Transformations” and “Delete all History.”
2. In Mud Box, increase the mesh density and add sculpt layers as needed.
On the “Mesh” menu, select “Add New Subdivision Level” and sculpt the details in a new layer. You might have to subdivide the model to level 3 or higher.
Avoid using tesselate in any Mud Box tools during the sculpting process. We need to preserve the UVs.
3. Sculpt all the details to create the high-density mesh.
I sculpted detail only on the head and jaket.
4. Extract the displacement map from Mud Box (bake displacement).
The “Extract Texture Map Operation” is located under the "UV&Maps" menu.
In Mud Box, you can transfer paint layers or create Ambient Occlusion Map, Displacement Map, or Normal Map. Let’s focus on calculating the displacement map. Since the low-resolution mesh originated from Maya and the high-density sculpt you just created share the same UVs, we can bake the displacement map.
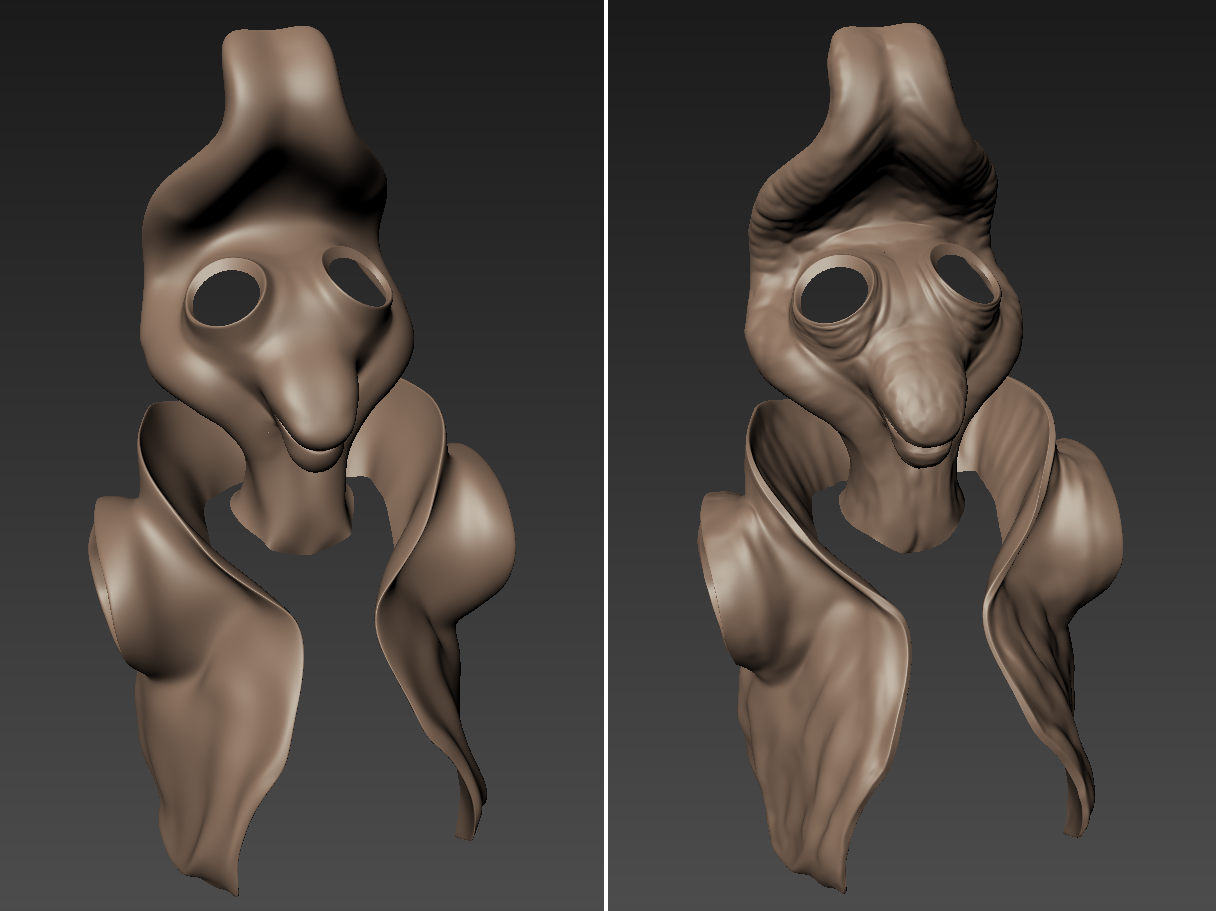
Displacement map, also known as the height map, is typically a 16 or 32-bit floating-point image. We can use a TIFF file format. The displacement map applied to the low-resolution mesh in Maya should closely resemble your detailed high-resolution sculpt (and don’t require geometry with millions of triangles).

| Mud Box sculp | Displacement | No displacement |
Video of how to do create the displacement in Mud Box: 09_2823_Project4_MudBox_Displacement
5. Start to build your Shader in Maya: The displacement map applied to the low-res mesh in Maya should look quite close to your detailed hi-res sculpt.
After you extract the displacement map. You can test it in Maya, This will be the beguining of your Maya Shader Network.
It is time to work on the texture set in Substance Painter: We will bake the geometry maps and generate the Texture Set for your asset.
You can work from one mesh but if you want to calculate some of your bakes comparing 2 meshes like we did in Mud Box, you will need two FBX files. One with the details from Mud Box and one without.
Exporting from Maya the FBX requires that the "File specific options" under Geometry don't have the Smooth Mesh option checked. UNCHECK IT if it on.

Substance Painter will import Maya Materials (Shaders) as Texture Sets. I recommend that you use only one Material in Maya to simplify the process.
The vertex color from Maya will become color IDs during the baking.
The the model parts (like the head, arms, and clothing itens) can be used as geometry masks to help on the texture creation.
The layer system in Substance Painter looks very similar to Photoshop but it has much more functionality and it is more complex to work with.
Some useful details of Substance Painter workflows will be discussed in class.
Here there is a video about setting up the Substance Painter work: 10_2823_Project4_Prep_Subs.mov
And this is a video about the Substance Interface: 11_2823_Project4_Subs_Intro
Before you can texture your asset you will have to bake the geometry maps. Here is a 6-minute video about baking: 12_2823_Project4_Subs_Bake.mov
Often is necessary to retouch the mesh maps. This can be done in Photoshop.
Working with Layer in Substance requires some planning. The assignment of layer to discret model parts and the use of geometry and color masks is as important as the choices of materials.
This 7-minute video shows the layer and materias choices I made in this class project: 13_2823_Project4_Subs_Layers
After you finish texturing. Export all maps at the desired resolution and build the Shader in Maya.
Here is a 3-minute video on exporting textures: 14_2823_Project4_Subs_Export.mov
7. Finalize project 4 in Maya with Shaders and the Turntable rendering:
The building of the shader in Maya is in this 4-minute video: 15_2823_Project4_Maya_Turntable.mov
You can also create a USDX file to pack your asset in one single file for distribution.
We will explore the use of .usdx files to create assets that can be distributed for use in 3D platforms like the Augmented Reality (AR) during class. But this is not part of your assignment.
USD - Universal Scene Description is a software architecture developed by Pixar and has been integrated unto Maya. Apple is using the usdx format to distribute 3D assets including textures and material properties that behave interactively.
01_2023_Project2_TurnTable
02_2823_Project3_retopologize_Head.mov
03_2823_Project3_retopologize_Head_Eyelids.mov
04_2823_Project3_Eye.mov
05_2823_Project3_Inside_Mouth.mov
06_2823_Project_UV_Layout.mov
07_2823_Project3_Vertex_Color.mov
08_2823_Project3_Maya_Turntable.mov
09_2823_Project4_MudBox_Displacement.mov
10_2823_Project4_Prep_for_Subs.mov
11_2823_Project4_Subs_Intro
12_2823_Project4_Subs_Bake.mov
13_2823_Project4_Subs_Layers.mov
14_2823_Project4_Subs_Export.mov
15_2823_Project4_Maya_Turn_Table.mov
16_2823_Project4_Maya_Subs_Connection.mov
The play list for this class is also on NJVID: https://www.illumira.net/showcollection.php?pid=njcore:204323